10 Best Indoor Palm Trees to Grow at Home
Many types of indoor palm trees make excellent additions to modern living spaces. Few houseplants are quite as dramatic as towering Kentia Palm, Chinese Fan, or Ponytail Palm. Here we’ve rounded up 10 of our absolute favorite indoor palm trees. We’ve included expert care instructions and key considerations for each so you can find your perfect match.

10 Popular Types of Indoor Palm Trees to Grow at Home
Here, you’ll find 10 of our absolute favorite palm trees to grow at home. We’ve included a brief overview of light, feeding, watering, and general care requirements for each so you can find the perfect fit for your home.
1) Parlor Palm (Chamaedorea elegans)
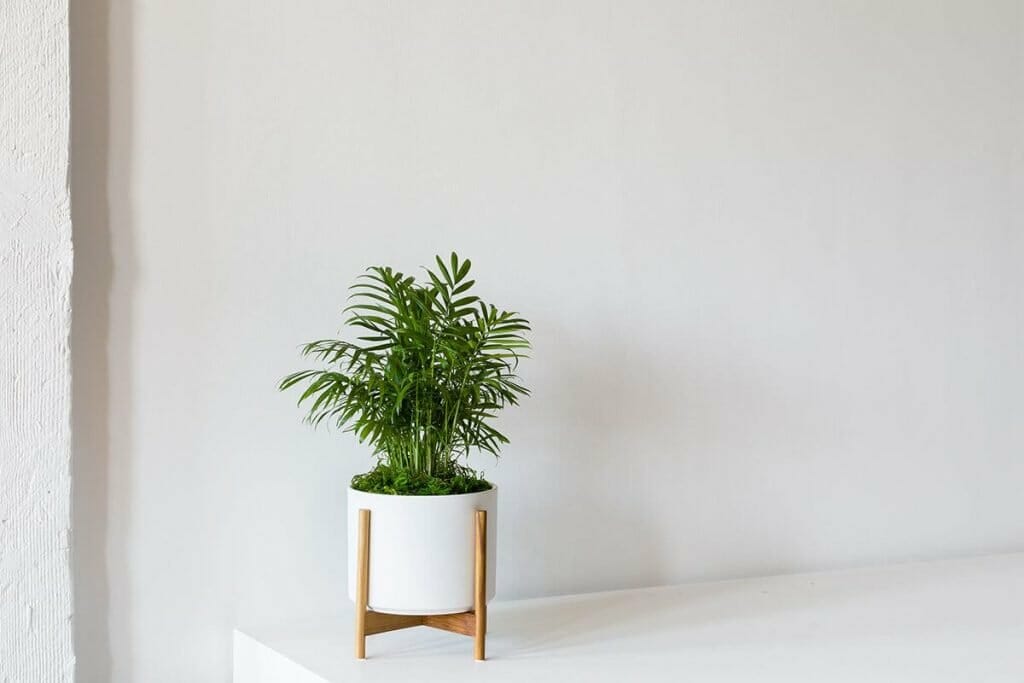
One of the most popular palm trees used as houseplants is the Parlor Palm or Neanthe Bella Palm (Chaemaedorea elegans). It is a small species that originated from the rainforests in Guatemala and Southern Mexico. It has a compact and clumping growth habit and attractive arching leaves.
| DIFFICULTY: | Parlor Palm is an easy-care indoor palm plant. |
| LIGHT: | This indoor palm prefers medium to bright indirect light, but it can tolerate low light conditions. It does best in areas where there is good early morning or afternoon indirect light. |
| TEMP & HUMIDITY: | This plant grows best in average home humidity and temperatures between 65°F to 75°F. |
| WATERING: | Feed them with basic fertilizer once a month or every two months to keep them healthy. |
| FEEDING: | An average Parlor Palm plant grows about 10 to 12 ft in height but will remain contained when planted indoors and in pots. |
| GROWTH: | An average Parlor Palm plant grows about 10 to 12 ft in height, but will remain contained when planted indoors and in pots. |
| TOXICITY: | Non-toxic to pets and humans. |
2) Areca Palm (Dypsis lutescens)

Dysis lutescens, commonly known as Areca Palm, is a cane type of palm tree native to Madagascar. It has several other common names, including Bamboo Palm, Golden Cane Palm, Yellow Palm, and Butterfly Palm.
A recipient of the Royal Horticultural Society’s Award of Garden Merit, this attractive indoor plant gains recognition for its soft fronds that arch upwards and its multitude of uses and benefits in the home. In fact, it is the most widely grown ornamental indoor plant in its genus.
Further reading: Areca palm plant care at home.
| DIFFICULTY: | Areca Palm is an easy-to-grow and low-maintenance houseplant. |
| LIGHT: | Areca Palm prefers bright, indirect light. It can tolerate low light conditions, and too much direct light can scorch the leaves. Place it in a well-lit room because insufficient light will result in slow growth. |
| TEMP & HUMIDITY: | This plant requires average humidity and average room temperatures (65°F to 75°F, not below 55°F). |
| WATERING: | Although Areca Palm endures occasional drought, it grows best in moderately moist soil. Let the soil dry out before the next watering. Avoid overwatering to prevent root rot and other damage. |
| FEEDING: | Feed once a month in spring and summer to keep it in its best form. |
| GROWTH: | Mature plants typically grow up to 8 ft in height. |
| TOXICITY: | These indoor palms are pet- and kid-friendly. They are non-toxic to cats and dogs if ingested. |
3) Pygmy Date Palm (Phoenix roebelenii)

Most date palms grow as tall as 75 ft. However, a particular small type can be grown in pots and ideal as an indoor houseplant, the Pygmy Date Palm (Phoenix roebelenii). It is a dwarf palm native to Southern China. It is also called Miniature Date Palm (because of its size) and Phoenix Palm.
Pygmy Date Palms remain reasonably small. The narrow, feathery leaves, which grow about 3 to 5 ft long, can be glossy green, silvery-green, or darker green. They form a lush crown atop a thin trunk. The crown’s base often shows lots of retained leaf bases, giving this palm a distinctive feature.
Plant these indoor palms as a single stem specimen or in groups of three.
| DIFFICULTY: | Pygmy Date Palm is easy to grow and maintain. |
| LIGHT: | This palm prefers full sun but also enjoys partial shade or filtered light. Place it in an area with bright natural light throughout the day. |
| TEMP & HUMIDITY: | This type of date palm tolerates light frosts but not a hard freeze. Thus, it’s best to keep it indoors in winter. The ideal room temperatures are around 65°F to 75°F. Misting to improve humidity will help the plant flourish. |
| WATERING: | Regular feeding with fertilizers specially formulated for palms is ideal. Feed with an 8-2-12 or 8-0-12 fertilizer monthly in spring and summer. |
| FEEDING: | This palm prefers full sun but also enjoys partial shade or filtered light. Place it in an area with bright natural light throughout the day. |
| GROWTH: | These plants are slow growers. Pygmy Date Palms typically reach a manageable height between 4 ft to 8 ft when grown in a pot indoors. |
| TOXICITY: | Non-toxic to cats and dogs. |
4) Chinese Fan Palm (Livistona chinensis)
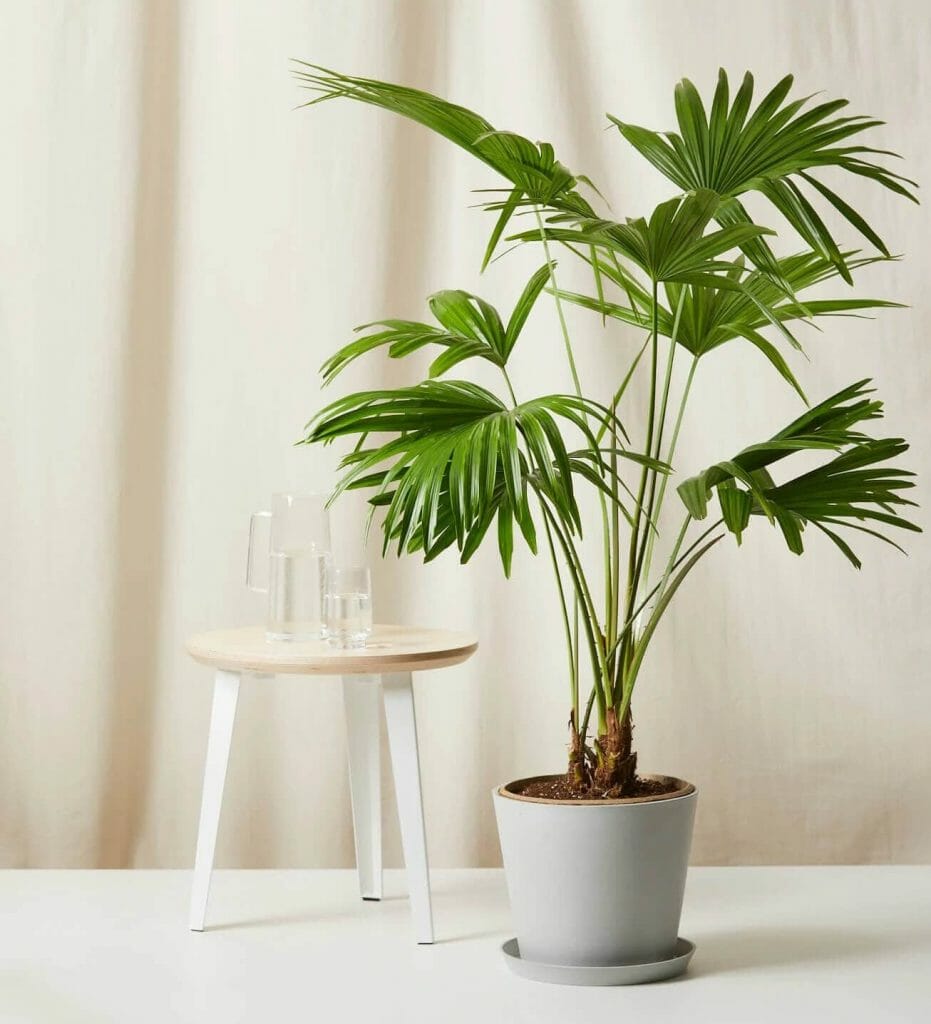
It would be difficult to miss the beauty of the Chinese Fan Palm (Livistona chinensis) with its attractive foliage and upright growth habit. This big, sub-tropical palm tree is also known as Fountain Palm. It is native to Taiwan, Southern Japan, and China.
This Florida-favorite palm tree features yellow-green fan-like leaves and tall stems. For indoor settings, a small-sized cultivar like dwarf Chinese Fan Palm or Taiwan Fan Palm (L. chinensis var. subglobosa) is perfect.
| DIFFICULTY: | Growing a Chinese Fan Palm is easy, especially in the right growing conditions. |
| LIGHT: | This palm prefers indirect, bright light year-round. Place it in a sunny area but out of direct sunlight. Rotate the pot about once a week for even exposure to light. |
| TEMP & HUMIDITY: | Like most palms, the Chinese Fan Palm is slow-growing and doesn’t need much fertilizer. Feed with a slow-release fertilizer once in spring and again in summer to keep it thriving. |
| WATERING: | Water rigorously, then allow the soil to dry slightly between watering periods. Do not overwater as too much moisture may damage the plant. |
| FEEDING: | Like most palms, Chinese Fan Palm is slow-growing and doesn’t need much fertilizer. Feed with a slow-release fertilizer once in spring and again in summer to keep it thriving. |
| GROWTH: | This species is slow-growing. It grows around 6 ft to 7 ft tall indoors in a container. |
| TOXICITY: | Non-toxic to cats and dogs. |
5) Ponytail Palm (Beaucarnea recurvata)

Beaucarnea recurvata, or more commonly known as Ponytail Palm, is a popular houseplant known for its stunning foliage. It flaunts attractive leaves and a bulbous trunk. The long, hair-like, and curly leaves grow from the trunk’s top, giving off a ponytail-like appearance.
Other common names of this species include Bottle Palm Tree and Elephant Foot Tree. Despite the “palm” in its name, Ponytail Palm is not a “true palm.” It is a part of the Asparagus (Asparagaceae) family.
| DIFFICULTY: | Ponytail Palms are easy-to-grow and forgiving plants – a beginner-friendly indoor palm. |
| LIGHT: | This plant prefers bright light. Place it in full sun with at least 6 hours of direct sunlight a day. |
| TEMP & HUMIDITY: | Average room temperature is ideal for most of the year. Keep the room temperature around 50 to 55°F in the winter. |
| WATERING: | Keep the soil somewhat dry, as it does not like soggy soil. Let it dry out completely before the next watering. |
| FEEDING: | Feeding with regular houseplant fertilizer two to three times per year is best for growing Ponytail Palms. |
| GROWTH: | It’s a slow-growing plant that reaches up to 6 ft to 8 ft in height. |
| TOXICITY: | Non-toxic to pets and humans. |
6) Majestic Palm (Ravenea rivularis)

Majesty Palm or Majestic Palm (Ravenea rivularis) is a large tropical palm that exhibits upward-arching, feathery fronds and a slightly swollen trunk base. It is native to Madagascar. Although relatively new as a houseplant, its majestic form makes an excellent addition to interior design.
| DIFFICULTY: | Majestic Palm is a robust and low-maintenance indoor palm. |
| LIGHT: | Majesty Palms thrive in bright, indirect light. Avoid placing it in direct sunlight to prevent leaf scorching. |
| TEMP & HUMIDITY: | It needs average room humidity and temperature. Maintain temperature between 65 to 75°F to keep it comfortable. |
| WATERING: | Watering 1-2 times per week is sufficient to keep it healthy. Allow the soil to dry slightly before re-watering. |
| FEEDING: | Feed using a slow-release or a general houseplant fertilizer two to three times during the growing season. |
| GROWTH: | Majestic Palm typically grows to 15 to 20 ft in height when given enough space. It is medium- to fast-growing. |
| TOXICITY: | Non-toxic to pets and humans. |
7) Sago Palm (Cycas revoluta)
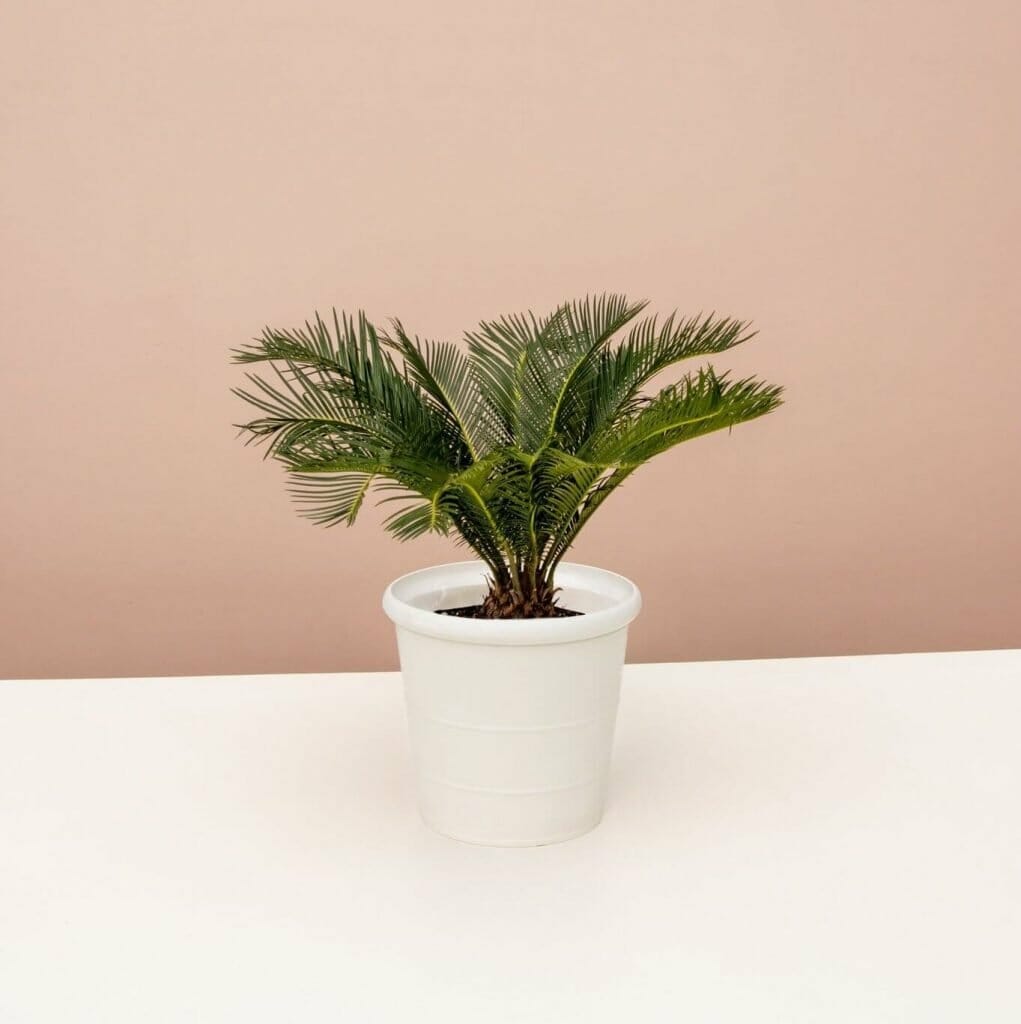
Although not a “true palm,” Sago Palm (Cycas revoluta) deserves a spot on our list, considering its popularity as a houseplant. It exhibits an upright habit, a pineapple-looking trunk, and attractive, feathery fronds. It is native to southern Japan.
Other known common names of this plant include King Sago, Japanese Funeral Palm, and Palm Cycad.
| DIFFICULTY: | While this houseplant isn’t precisely beginner-friendly, most plant hobbyists find it relatively easy to care for and maintain. |
| LIGHT: | While this houseplant isn’t beginner-friendly, most plant hobbyists find it relatively easy to care for and maintain. |
| TEMP & HUMIDITY: | It prefers warm and humid conditions. Average room temperature is usually suitable. Keep the palm away from heating and air-conditioning vents that can damage the plant. |
| WATERING: | This attractive houseplant prefers well-drained soil and dislikes too much moisture. Water only when the ground feels dry to touch since it does not respond well to overwatering. |
| FEEDING: | Regular fertilizing once a month will ensure growth and vigor. |
| GROWTH: | It is a slow-growing houseplant that usually reaches about 3 ft in height. |
| TOXICITY: | All plant parts are toxic to both pets and humans if ingested. Thus, take extra precautions if you are growing a Sago Palm plant around cats, dogs, and small children. |
8) Kentia Palm (Howea forsteriana)

At first glance, you might confuse this famed indoor palm plant with a Sentry Palm as they look quite similar. Their main difference, however, is that the leaves of Kentia Palms do not droop as much compared to Sentry Palm’s.
Kentia Palm or Howea forsteriana is also known as Thatch Palm. It is native to Lord Howe Island in Australia. Highly favored as an indoor plant, this beauty flaunts a slender trunk and dark green arching fronds.
Further reading: Kentia palm plant care at home.
| DIFFICULTY: | This type of indoor palm tree does not require a significant amount of light to grow. You can place it in shady areas, and it will still thrive. Avoid direct sunlight, though, as it can burn the leaves. |
| LIGHT: | Indoor-grown Kentia Palms require moderate watering, usually only when the soil becomes dry. Avoid under-watering or over watering to keep it healthy. |
| TEMP & HUMIDITY: | Average humidity and room temperatures of around 65°F to 75°F are best for this plant. However, it can stand low temperatures down to 25°F. |
| WATERING: | Indoor-grown Kentia Palms require moderate watering, usually only when the soil becomes dry. Avoid under-watering or over-watering to keep it healthy. |
| FEEDING: | As with other plants, excessive feeding will only cause more harm than good. Feed with a slow-release fertilizer only when the plant is actively growing. |
| GROWTH: | Indoor, container-grown Kentia Palms typically reach up to 10 ft in height. They are slow-growers. |
| TOXICITY: | Non-toxic to pets and humans. |
9) Yucca Palm (Yucca elephantipes)

Yucca elephantipes, commonly known as Yucca Palm, Spineless Yucca, or Stick Yucca, is one of the best tree-like houseplants for indoor use. It flaunts thick cane stems and distinctive sword-shaped, soft palm-like foliage. It is an evergreen plant native to Central America and Mexico.
| DIFFICULTY: | Many recognize Yucca Palm for its ease of care. It is a low-maintenance houseplant. |
| LIGHT: | It likes bright, indirect sunlight best. However, this hardy plant also tolerates low light conditions. Near the south- or west-facing window is the best location for growing it indoors. |
| TEMP & HUMIDITY: | The ideal temperatures for growing this indoor plant are between 60°F to 80°F. Yucca can tolerate temperatures as low as 30°F and as high as 90°F. It also grows well in medium humidity. |
| WATERING: | Water the palm plant only when the top layer of the soil dries. Reduce watering in colder months. |
| FEEDING: | Yucca Palm will benefit from occasional feeding. Fertilize with a balanced fertilizer during spring and summer to maintain attractive foliage. |
| GROWTH: | When grown indoors in a container, the growth rate of a Yucca Palm is slow. It grows to around 5 ft tall. |
| TOXICITY: | Yucca Palm is toxic to pets and humans if ingested. |
10) Cascade Palm (Chamaedorea cataractarum)

Cascade Palm is a small palm tree from Central America and Southeastern Mexico. While most indoor palms have single trunks, this famed plant stands out for its bushy appearance. It has a short trunk, shrubby growth, and dark green fronds. This clumping palm is also known as Cat Palm or Cataract Palm.
| DIFFICULTY: | Cascade Palm is a high-maintenance plant compared to other indoor palms. For that reason, it can be somewhat challenging to grow indoors. |
| LIGHT: | This indoor palm plant requires indirect, bright light to flourish. While it needs more light than other indoor palm plants, it does not do well in direct sunlight. |
| TEMP & HUMIDITY: | Place the Cascade Palm away from heating and cooling vents to protect it from extreme temperatures. The ideal room temperatures are around 80°F during the day and 45°F or higher at night. Humidity should be approximately 55%. |
| WATERING: | It grows best in moist, but not soggy, soil conditions. Water regularly and do not let the soil remain dry for extended periods. This plant does not tolerate drought. |
| FEEDING: | Feeding once a month with a basic houseplant fertilizer at half the recommended rate is best for this plant. Fertilize only during its active growth. |
| GROWTH: | This small palm grows only up to 3 ft tall when planted in containers indoors. |
| TOXICITY: | Non-toxic to pets and humans. |
Points to Consider Before Growing Palms Indoors:
- Choose a palm type that grows well indoors and is suitable for your own unique living environment. It’s essential to be aware of the prevailing light and temperature conditions in your home and the level of care you can provide.
- Consider the space in which you will be putting your indoor palm tree. Many of these plants can reach towering heights. Thus, it’s best to know the plant’s matured height so you can allocate sufficient space as it grows and provide a pot big enough to accommodate growth.
Wrap Up
Palm trees make excellent houseplants for indoor use. Aesthetic value aside, palms are also well-liked for their ease of care, hardiness, and low-maintenance nature. They are also generally easy plants to grow indoors as long as you provide the right growing conditions. For more, see our in-depth guide to the best potted palm trees for outdoor areas.
Further reading: discover the spiritual meaning of palm trees.

Madison is a writer and editor with a Bachelor’s degree in History and Political Science. She writes and photographs for various online and print publications in the gardening sphere and is the author of the book The Next-Generation Gardener.